Showing posts with label recipes. Show all posts

Monday, February 27, 2012

Freezer Cooking: Breakfast Burritos

I'm currently trying to stock our freezer with meals for when Little Baby arrives & I have no time to do anything besides nurse our newborn & take care of our toddler.  In anticipation of that blessed event, I made some breakfast burritos that are a variation on the Simple Dollar's recipe
 

I scrambled a dozen eggs & thawed & cooked 2 bags of pre-chopped onions & peppers. While the peppers were cooking, I also drained & rinsed a can of black beans. 

**Side note, if you are using frozen peppers & onions & have a lot of excess moisture, don't throw it away!  Drain it off & add it to your homemade stock.  It's super yummy & free!  


Assemble burrito:  eggs, cheese, a spoonful of beans, some peppers & onions, & some salsa if desired.  (I found the salsa made the tortillas a little on the soggy side, but maybe that's just me?)


Wrap burritos in saran wrap or foil, bag, label & freeze.  To thaw, unwrap, microwave for a minute or two, and voila, you have breakfast!

I was able to make these rather cheaply, so here's my cost breakdown using Aldi ingredients, unless specified:

12 eggs--99 cents on sale @ Walgreens
12 tortillas--99 cents
1 can of beans--55 cents
1 cup of cheese-- 44 cents
Salsa--Free (Thanks Gram for sharing your canning!)
Peppers & Onions--46 cents (approx)

Total:  $3.43 or  $0.29 each

Nothing like a healthy breakfast you can eat with one hand while nursing a baby!

Tuesday, February 21, 2012

Use It Up: Homemade Vegetable Stock

Recently I was reading online about people making vegetable stock from their veggie scraps & I figured I'd try it.  I kept an old cottage cheese container in our freezer & any time I peeled a carrot, chopped up some celery, or onion I simply put the scraps in the container.  It took about .2 seconds for it to be full.  I also collected fresh veggie scraps for stock as well, which made for two crock pots of stock. 


I simply threw my veg in the crock pot, filled it with enough water to cover all of my vegetables, & seasoned with my favorite spices.  I used 2 bay leaves, black pepper, red pepper, garlic powder, Italian seasoning, & onion powder.  (I actually used some onion powder that globbed into large balls due to lovely Arkansas humidity & I would have normally thrown out.  Yay!) 


I set my crock pot on low & allowed the stock to simmer for approximately 4 hours or until the vegetables became somewhat translucent.  Then I simply strained the stock.  And by simply I mean spilt scalding liquid all over our kitchen, down our cabinets, & on my feet while saying some not child friendly words.  Whoopsie.  Allow yours to cool first, won't you?


After years of buying vegetable stock, I am so happy to essentially be turning my trash into treasure.  This stock is a delicious, nutritious,  money saver & I now have two large containers of stock in our freezer.  If only I had tried doing this sooner!

Friday, February 17, 2012

Pumpkin Chocolate Chip Muffins

I'm at the tail end of a marathon two day freezer cooking session, in the hopes of filling our freezer with treats before Little Baby arrives.  These muffins are a variation of MoneySavingMom's recipe, but I made them a little more healthful, used sweet potato puree instead of pumpkin, & cooked a double batch. They're delicious, freeze well, & are something that is great any time of the day. 


Pumpkin Chocolate Chip Muffins

  • 4 eggs
  • 1 1/2 cups sugar
  • 16 oz pureed pumpkin (sweet potato)
  • 3/4 cups oil
  • 3/4 cups of applesauce (sweet potato or banana can also be used)
  • 2 cups  whole wheat flour
  • 1 cup white flour
  • 1 tablespoon of flax meal
  • 2 teaspoons baking soda
  • 2 teaspoons baking powder
  • 1 teaspoon ground cinnamon
  • 1/2 teaspoon clove
  • 1 teaspoon salt
  • 1/4 package chocolate chips (add a tiny bit of flour to the chips so they don't sink to the bottom)
In a large mixing bowl, beat eggs, sugar, pumpkin, applesauce, and oil until smooth. Add in dry ingredients and mix well. Fold in chocolate chips. Fill greased or paper-lined muffin cups 3/4 full. Bake 16-20 minutes at 375 degrees.
Makes 24-30 muffins.

Enjoy!


**I lowered the temp to 375 because my first batch came out too dark.  It could be my oven, but if your oven runs hot keep it at 375 rather than the 400 degrees in MSM's recipe.

Thursday, February 16, 2012

Sweet Potatoes vs. Pumpkin in Baking

I'm trying to spend $150 a month on groceries, & one part of keeping that restrictive budget is making sure no food goes to waste.  So when I saw our bag of sweet potatoes looking a little weird (they're so darn ugly I never know if they're getting old) I figured I should cook them up just in case.  

The only problem is our family wouldn't go through a bag of cooked sweet potatoes before they rotted, so I figured I could use them in place of pumpkin in a muffin recipe.  Here's how I did it:


I simply baked potatoes at 450°F for 20-30 minutes or until the potato shrunk up from the skin.  


I then used a fork to pierce & remove the skin.  


Because my food processor is just god-awful, I had to chop the sweet potato, fork mash it, then add it to the food processor until it was pureed.  If you happen to have a decent food processor, feel free to skip many, many of these tedious steps.


Simply measure & use just like you would pumpkin.  It tastes the same & with canned pumpkin in short supply in recent years, this is an extremely fresh & economical alternative. Try it, you'll like it. 

Friday, January 27, 2012

Freezer Cooking: Vegetarian Mexican Lasagna

I'm trying to fill our freezer with meals & baked goods for the impending arrival of Little Baby.  The dish I made today is Vegetarian Mexican Lasagna, which to me, is heaven in a casserole dish.  If you don't want it to be vegetarian, by all means, add some meat.  Conversely, if you're looking to add a meat free dish to your repertoire, this is certainly a great place to start.  I love it because it's quick, it's easy, it's a great way to use up undesirable leftovers, AND it can be frozen.  Here's how it's made:


Ingredients:
1 cup of brown rice cooked according to directions                    1 can of black beans
1 cup of diced green peppers                                                         1 can of corn
1 c diced onion                                                                              4-6 tortillas
1/2 can of El Pato                                                                          shredded cheese
1 can of diced tomatoes with chiles, or 3 fresh tomatoes diced, or 1 cup of salsa


Spices:
1/2 T of Cayenne Pepper                            1 T Cumin (not pictured)
1 T of Chili Powder                                     1T Garlic Powder or several cloves of garlic


Saute veggies & spices


Rinse & drain corn & beans.  Mix in salsa, peppers, onions, rice, & El Pato & thoroughly incorporate.  


If you intend to freeze the lasagna & don't have a disposable pan, line the pan with foil going both ways.  Lay down a tortilla.

Cover with veggie/rice mixture.  Then cover with a layer of cheese.  


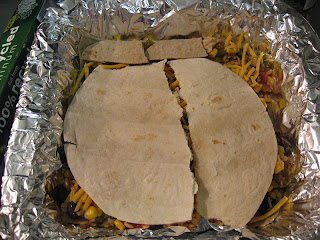
Layer again with an additional tortilla.   (I took this opportunity to use up tortillas that had broken & would have otherwise wound up in the trash.  Yeah saved food!)  Repeat process until all of the veggie mix is used & cover the top with another layer of cheese. 


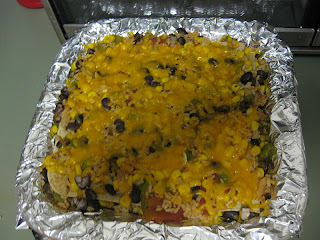
 If you plan on freezing, cook the lasagna for 10 minutes at 325°, allow to cool, wrap & freeze.  If not, place lasagna in the oven at 325° for 20 minutes or until cheese is melted/brown. Garnish with sour cream & enjoy! 

Thursday, December 15, 2011

Eating Out of the Pantry & Taking a Stab at Menu Planning

I'm not a great cook.  Sufficient yes, but I'm definitely not whipping up any gourmet dishes.  Over the course of our married life I have to admit that I haven't put much effort into making supper & have often found it easier to grab take out than sit down and think about deconstructing recipes.  I am such a model homemaker.

 Before our holiday travels we planned on eating from our pantry.  I bought $50 worth of produce & perishable items, but beyond that I planned on eating from the pantry.  In order to make this work, I actually did menu planning.  Long touted as the frugal grocery shopper's best friend, I have avoided planning a menu like the plague.  I still didn't do it properly--I didn't plan it around sales, I didn't really stick to it (I mainly used it as a guideline) & I only did it one week at a time, but I found it totally helpful.

By planning menus around what we had in the pantry & what perishables needed to be eaten I was able to tackle dinner every night without so much as a batted eye lash.  As of today I have successfully made two weeks worth of home cooked meals as well as enough chili to take to a church carry-in & to freeze for after Little Baby.  I know some people can do this easily, but for me, this was a huge milestone.

In addition to the deliciousness, by planning menus no food spoiled & we were able to eat on a very small amount of money.  I hope to add more recipes to our rotation shortly, but for the meantime I've been able to come up with a month's worth of meals with minimal effort.  I definitely think that I'm going to be using menu planning in the new year.  Hopefully it will be a way we can lower our grocery bill & get dinner on the table!    

Wednesday, March 30, 2011

Meatless Monday...On Wednesday

I don't know about your neck of the woods, but around here it has gotten cold and misty.  I do hope that spring blossoming shortly, but for now I'm cooking cold weather food one more time.

My mom makes some of the best soups around, and one of my favorites is her chili.  Unfortunately, most of the time chili involves beef, so once I went veg, I needed to come up with a chili that was still comforting and delicious, but didn't lose its heart.  This is absolutely nothing like the traditional chili my husband grew up with, so I suppose you could call it something between a chili & a tex-mex soup.  Here's what I came up with...

Ingredients:
1 64 oz can of tomato or mixed vegetable (V8 type) juice  (I usually prefer mixed because its a great way to get the nutrients of some veggies that I don't eat on a daily basis, but I only had tomato on hand).
1 can black beans
1 can kidney beans
1 can corn
1 can crushed tomatoes
1 can tomatoes with green chilies
* Optional, but in my opinion FABULOUS--1 can El Pato (more on this later)
2 cups of cooked brown rice

Spices can be adjusted 1 teaspoon-1 tablespoon depending on your personal heat preference, but I'm a pepper belly and I LOVE it HOT!

1 tbsp onion powder
1 tbsp garlic powder
1 tbsp black pepper
1 tbsp paprika
1 tbsp chili powder
1 tbsp cayenne pepper

Directions:

While you're prepping the other ingredients start cooking your rice; either in a rice cooker or on the stove top.
You can cook brown rice in a rice maker!  Who knew?  Just add 2 cups & 2 tbsp of water per cup of rice
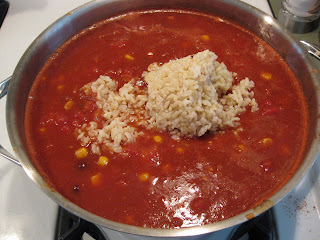
 In a large pot open the can of juice.  Most juice tends to separate, so be sure to shake the can once or twice.  Add that to the pot, then add the crushed tomatoes with their juices, the tomatoes & chilies with their juices, & the El Pato. Set on medium heat and allow the flavors to incorporate.


*  A note about El Pato--In my opinion El Pato is spicy heaven in a can.  My handsome husband introduced it to me way back when he was my handsome manfriend.  It is super spicy & super delicious.  More stores nationwide are carrying it, so look for it in your Latin food aisle.  In Indiana I found it in Kroger, here I found it in Walmart & Harps.

Next, you will need to drain & rinse your beans.


**Green  Living Freak Alert:  I like to save water, so this is how I open the cans...
 Drain your kidney & your black beans, then drain your corn over the beans.  Then, use the water from rinsing out all of your cans & pour over your beans.  After rinsing your cans & the water from the corn, the brine from the beans should be washed away, without you needing to use any extra water.  If this is too OCD for you, just drain & rinse the beans.

Once all of the beans & corn are rinsed add them to the pot.  Add in all of your seasonings; I have to admit that I don't precisely measure, I usually just go around the top of the pot & make sure everything is covered.  (Extremely exact, huh?)  If that doesn't work for you, you can measure with your palm, ala Rachael Ray, or use measuring spoons.  I would warn you to wash your hands if you measure the cayenne with your palm!

After 15 minutes I like to taste and then adjust seasonings.  From here it is your call when you add the rice.  When using brown you don't run the risk of it getting as mushy as white rice, so you can add it earlier.  I personally like the rice to thicken the soup, so I don't mind if it isn't a perfect grain, but the choice is entirely yours.  Also, if you want a complete protein be sure to use the rice, it really makes this a healthful, meat free dish.

 Allow the soup to simmer & come together.  Like any soup, the longer you allow the flavors to develop the more delicious the soup is, but if you're in a hurry, you just want to make sure that everything is heated through.  It will be even more delicious after sitting in the fridge over night, I promise!

 I love to eat this over a tofu pup.  Even if you're not a big tofu eater, with this chili over a soy dog, it is bliss in a bun.
And if I can get my meat eating husband to try it, you know it must be good!  


I also like eat it as a quick burrito.  Just drain off the juices with a slotted spoon, plop on a tortilla, sprinkle with cheese, and maybe some sour cream.  Yum!

It is also awesome over a baked potato...I mean, seriously awesome.

In college I used to make this, eat off it for a week, and then freeze the remainder.  If you don't have a large family to feed, or want to make a double batch this is a fabulous option.  I also find that sometimes when I get down to the end of the pot there's a lot of extra juice left, but not a lot of substance.  I just pour it into a little container & freeze it for the next batch of chili.  It adds a lot of flavor & eliminates waste.

Hope you enjoy.  Happy Eating!


Wednesday, March 16, 2011

Breakfast of Champions: Baked Oatmeal

I suppose there has been a theme to my cooking this week--capturing the comforts of home.  This recipe is my take on a breakfast from Camp Amigo, a Mennonite camp near my hometown.  It is delicious, healthful, and very filling.   My mom's been making this for many years for us, and I've been adjusting the recipe to try to make it more healthy. I'll post both versions...

Camp Amigo Ingredients:
1 c vegetable oil
1 1/2 c sugar
4 large eggs
6 cups old fashioned oats (not instant)
2 c milk
1 tablespoon + 1 tsp baking powder
1 tsp salt
1 tsp cinnamon
2 apples (chopped)
1 c raisins


Camp Troyer Price Ingredients:   I've cut back the oil & sugars, while increasing the amount of fresh fruit, and natural sweetening spices.

1/2 c vegetable oil + 1/2 c applesauce
3/4 c sugar
4 large eggs
6 cups old fashioned oats (not instant)
1 c milk (I lower the milk because the added fruit will release their juices while baking.  Also, you can use powdered milk here if you want to save a little money).
1 tablespoon + 1 tsp baking powder
1 tsp salt
1 tsp cinnamon
1/2 tsp nutmeg
1/2 tsp ground cloves
4 chopped apples (I keep the skin on for the added nutrition, but if you don't like the peel, feel free to peel the apples before chopping them)
1 c fresh cranberries (I buy these at the end of the holiday season & freeze them for use over the next year.  I throw them in frozen)

Whatever version you choose, the directions are the same:


Mix oil (& applesauce), sugar, & eggs together on high until yellow & glossy.  Add remaining ingredients on medium. 

 Fold in apples...
 and cranberries. 

 If you don't have a paddle attachment, I would fold the fruit in by hand or you risk mangling the fruit. Bake at 400 degrees for 30-40 minutes. 

Enjoy!


A few notes:  This also freezes extremely well, so feel free to make a double batch & freeze one for later!  One other note, because there is a lot of moisture in this recipe, if you will not eat it rather quickly, I suggest storing your baked oatmeal in the fridge, as it can tend to mold, especially in the summer.

Monday, March 14, 2011

Meatless Monday: Haystack Supper

Perhaps this isn't the most healthy or frugal of meals, but for me it is all the comforts of home in a bowl.  Back home in Amish country, the haystack is a very common meal, and is often used as a church fundraiser.  It's like any regional dish, different people do it differently.  Here's how I build my haystack.


Layer brown rice, beans (I used black), soy meat (I seasoned it with onion powder, garlic powder, and cayenne pepper.  Beans & rice make a complete protein, but if you want meat, you can choose what you would like, just season it taco style).  Top with shredded cheese.


Add any other taco fixings that you enjoy.  I add salsa, sour cream, tomatoes, & lettuce. People back home add taco sauce or Western salad dressing.  It's totally up to you.


Now here's the thing that is NOT OPTIONAL when it comes to a haystack:  Doritos.  Crunch up Doritos and add to the top of your haystack.  This is also a great way to use up the little crumbles at the bottom of the bag. 

It is absolute deliciousness.  I promise you.