Showing posts with label frugal projects. Show all posts

Wednesday, May 1, 2013

Make It Do: Creating a Shaded Child's Wagon


We've been spending a lot of time outdoors, & it has been absolutely wonderful being able to enjoy some sunshine & watch the girls play together.  The only unfortunate thing is our backyard doesn't get much shade, so while I'm hanging laundry & Harper is sitting in our little utility wagon, she's basically roasting in the sun. 


Rather than go in search of a more child friendly wagon, I decided to rig up an umbrella on the wagon in a rather ghetto fabulous way.  One rubber band, a large twist tie, & a safety pin later, the umbrella was secure, & the girls had some serious shade in their wagon.


Of course, by the time I got the wagon all arranged, Harper decided she wanted to get out and walk. Oh well, at least it will be ready when the next load needs to be hung! 

Wednesday, July 25, 2012

Storing Up For Winter


One of the many wonderful things about summer is the bounty of produce.  We try to eat seasonally, so in the summer, while produce is at the peak of freshness I like to prep & freeze as much as possible for the winter.


When strawberries were on sale for $0.99/lb I went a little nuts & bought 10 lbs to be prepped & frozen.  The frozen fruit isn't so fabulous on its own, but they're delicious in cereal, yogurt, or smoothies. 


Though it's a lot of work, it's nice when the pickings are slim in the winter to be able to walk out to our freezer & taste the freshness of summer.  Plus, the work is much more fun when it's overseen by the happiest little sous chef in town!

Monday, July 16, 2012

Why I Mend Our Clothes


Back in the day people used to mend their clothes.  Back when people actually made their clothes rather than running down to the big box store to buy imported goods for a little bit of nothing.  My gram sewed, my grandma sewed, & her Amish relatives sure as heck sewed.  It's something that has been done for generations, & I have gotten into the habit of mending our clothes, & I'm not looking back. 


I'm not a great seamstress.  I don't think my skills ever improved past my 8th grade home-ec class, but I'm proficient enough.  I like the little labor of love sewing a button on JC's shirt, or mending the seam on a pair of Emerson's pants. I enjoy doing the same thing that my grandmothers & their grandmothers did for their families.  Our clothes last longer, our money goes further, & we put less in the landfill.  Mending our clothes is a simple act of love; love for my family & love for the Earth.  Simple. 

Wednesday, July 11, 2012

DIY Shoe Repair

I am a total shoe girl, so when my favorite pair of sandals started to fall apart I was super disappointed.  I couldn't find a cobbler in town, so when I found an adhesive repair product called Shoe Goo at Target, I figured it was worth a shot


 I simply followed the directions, applied the adhesive, & spread it around with a plastic knife.


I then secured the layers with clothespins.  


After a day, they were as good as new.  The repair was easy, environmentally friendly, & great for my wardrobe.  I'm thrilled to be able to cobble my own shoes!

Wednesday, March 21, 2012

Frugal Experiment: Cooking Dried Beans in the Crock Pot

I have long heard that cooking dried beans is more economical than buying canned beans.  Approximately 95% of our meals are vegetarian & we go through a lot of beans in a month, so when I recently found packages of black beans for $0.30/lb I figured it might be a worthwhile experiment. 


Simply sort & wash the beans.  


Find a recipe, pour beans, water, & seasonings in the crock pot.  


Cook overnight or approx 8 hours, drain (if desired), package, & freeze.  Piece of cake!

Here are a few things I learned from my little frugal experiment:
  • Do not overlook the importance of sorting & rinsing the beans before you cook them. You won't save any money using dried beans if you need expensive dental work to repair a chipped tooth from an overlooked rock.  Emerson & I sorted our beans while watching a movie, & she thought it was the greatest thing ever.  
  • Aside from water to bean measurements, you don't necessarily need a recipe. I decided to double & loosely follow this recipe, but my beans ended up too spicy for E, so I can only use them for chili or other foods that she wouldn't normally eat.  Major bummer.
  • If you do find a great deal on dried beans, STOCK UP!  I only bought two 1 lb packages of beans because I hadn't tried cooking with dried beans before.  I am now chock full of cheap bean regret.  Chock full.
  • Unless you find a fabulous deal on dried beans, this might not be the most economical choice for you.  The Simple Dollar does an in depth cost analysis of dried vs. canned beans, but from my experience,  unless I find a fabulous deal, I cannot buy dried beans cheaper than I can canned.  
I'm definitely pleased I tried cooking with dried beans, & hope to again in the near future...as long as I can get a good price.  

Friday, March 16, 2012

Homemade Butter in a Mason Jar

Recently, I purchased some cream for potato soup & while contemplating what to do with the remaining cream, I remembered making homemade butter with my gram when my sisters & I were little.  
Don't mind the crap photo, JC had our camera & I had to use my cell.  Apologies. 
It was SUPER simple & quite satisfying.  I used this tutorial as a rough guide (I didn't wash the butter or salt it), filled two small mason jars halfway, & shook the dickens out of them.  I did the shaking while watching Lord of the Rings & it took me from the beginning of the movie until Frodo was running to Buckleberry Ferry @ The Inn of the Prancing Pony.  For you non-LOTR nerds, I would approximate it was a good 15 minutes of shaking.


The cream separated into butter & a lovely buttermilk, which I poured off & collected for the following morning's pancakes.  Both the pancakes & the butter were delicious & it was such a good use of something that often spoils.  If you've never tried making butter it's a fun arm workout & has tasty results.  Plus, how many people churn their own butter anymore?!  You could be one of just a few!

Happy churning!

Thursday, March 1, 2012

Sewing Marathon Results

I'm a terrible seamstress.  Just terrible.  It took me an extra week to make my 8th grade pillow in Home Ec.  Thank God I don't live in a time when I would be responsible for sewing absolutely everything we need. 

That being said, I have found that minimal sewing is essential to our little frugal life.  Today I spent the better part of the day sewing with some extra flannel we had, & here are the results:


I made 7 cloth diaper doublers, 16 cloth wipes, 10 cotton ball replacements, & 6 flannel breast pads.  Hopefully this will go a long way toward helping once Little Baby arrives & we have two babies in cloth diapers & I'm nursing. 

I'm happy to say that all of the above didn't cost us a dime, but I am very thankful I don't have to do this every day.  Seriously.  

Tuesday, February 21, 2012

Use It Up: Homemade Vegetable Stock

Recently I was reading online about people making vegetable stock from their veggie scraps & I figured I'd try it.  I kept an old cottage cheese container in our freezer & any time I peeled a carrot, chopped up some celery, or onion I simply put the scraps in the container.  It took about .2 seconds for it to be full.  I also collected fresh veggie scraps for stock as well, which made for two crock pots of stock. 


I simply threw my veg in the crock pot, filled it with enough water to cover all of my vegetables, & seasoned with my favorite spices.  I used 2 bay leaves, black pepper, red pepper, garlic powder, Italian seasoning, & onion powder.  (I actually used some onion powder that globbed into large balls due to lovely Arkansas humidity & I would have normally thrown out.  Yay!) 


I set my crock pot on low & allowed the stock to simmer for approximately 4 hours or until the vegetables became somewhat translucent.  Then I simply strained the stock.  And by simply I mean spilt scalding liquid all over our kitchen, down our cabinets, & on my feet while saying some not child friendly words.  Whoopsie.  Allow yours to cool first, won't you?


After years of buying vegetable stock, I am so happy to essentially be turning my trash into treasure.  This stock is a delicious, nutritious,  money saver & I now have two large containers of stock in our freezer.  If only I had tried doing this sooner!

Wednesday, January 18, 2012

Cloth Wipes & More Found Flannel

It appears that unless some miracle happens, we will have two in diapers once Little Baby makes her appearance.  In anticipation I was hoping to make more cloth wipes, but I had run out of flannel & couldn't bring myself to go out & buy some. 

Fortunately, over Christmas my Mother-in-Law let us "shop" her basement & I came away with some receiving blankets that were perfect for wipes!  Then my flannel cup runneth over when a two pairs of pajama pants ripped at their very stressed seams & after trying to mend them once before, I figured it was time to give up the ghost.


Out of 1 1/2 of the receiving blankets I made cloth wipes, & out of the remainder I hope to make some cloth diaper doublers.  I'm not sure what I'll do with the 4 panels of flannel from the pants, but it's rather thin, so I think it might be better suited for cotton face pads.


Any other suggestions for my fecundity of flannel?

Tuesday, December 13, 2011

25 Clever Ideas to Make Life Easier


I love a good list & my friend Julie shared an amazing list of clever household tricks with me today.  It's absolutely brilliant & I plan to employ many of the suggested techniques in my own home.  I've already dug my egg carton from the recycling to hold our Christmas ornaments.  Now if only my flat sheets looked that fabulous!


Tuesday, September 6, 2011

From Trash to Treasure: Recycling Furniture

I am always so impressed & inspired when people are able to completely transform old furniture into new & beautiful things.  I only wish I had that vision.  Here are two amazing transformations...


Fresh Cut Flours turned a tv stand into the most cutie pie play kitchen ever. 


And Nice Girl Notes took the drawers from this night stand


and turned them into a doll house!


Congratulations ladies for being creative & green.  Excellent work!


Saturday, August 27, 2011

Recycled Craft Ideas


Country Living put together a list of some ways to reuse items around the house.


Some of the ideas are a little hokey & I can't see ever doing them in my own home, but the above images are two of my favorites.  I definitely think I'm going to do the Ball Jar.  Definitely.  Check it out

Thursday, August 11, 2011

Everything You Wanted to Know About Homemade Laundry Detergent


I love making homemade laundry soap.   It is extremely simple & only requires a handful of rather cheap ingredients. 


 I first started making the liquid recipe a little over a year ago & have never looked back.  It's a huge money saver & is very environmentally friendly.  I've since moved on to using the powdered kind & I find making & storing the powder to be even easier. 


If you've ever been interested in making your own laundry detergent, but had reservations, I've come across a great resource for you.  Tipnut has compiled an extremely extensive list of commonly asked homemade laundry soap questions & their answers.  If you're on the fence I hope this helps you & convinces you to try it yourself.  You won't be sorry!

Saturday, August 6, 2011

On My Mind--A Day Late

Rhonda over at The Frugal Home does an On My Mind series on Friday.  I fell asleep before I could post my version, so forgive my tardiness. 


On my mind this week is this blanket I knitted when I was pregnant with Emerson.  Those white pieces of yarn coming out are some Lions Brand Suede yarn that I got at Big Lots for $1.50 a skein.  I took the blanket you see above apart & reknitted it, hoping that all I needed was to pay attention & a tighter stitch.  Unfortunately I'm mostly done with blanket number two & that dang yarn is doing the same pulled out curly thing.  After trying to knit this blanket twice with the same materials it is clear to me that despite my inferior knitting skills, the problem with the yarn, not the knitter.  Clearly there was a reason why the yarn was so cheap.  Ugh.  Hopefully I can pull it apart & finish it AGAIN (without the suede yarn) by Christmas. 

Thursday, August 4, 2011

You Know You're Cheap When...

One of the many treasures I found while cleaning out our attic was a stack of undeliverable wedding invitations.  For whatever reason we weren't able to get our invitations to 4 people the first time & were stuck with extra invites.  I was just getting ready to chuck all of them in the recycle bin, when it occured to me that there were un-used RSVP envelopes inside.  After a little digging I was left with four 41 cent stamped envelopes. 


Now, I have heard rumor that you can simply take such envelopes to the post office & they will give you a new stamp, but I'm lazy, & our post office is on a part of town that I never frequent, so I figured I'd come up with a different plan.


I first used a Sharpie to block out the address, then I used glued some paper I got for free from a local credit union to cover the address.  I then applied some 1 cent stamps that I had on hand & finished with a little bit of tape on each side of the paper.


Now I know that these envelopes look like the dickens, but they're perfect for mailing rebates.  For less than 5 minutes of work I saved $1.64--not a ton of money, but every little bit counts! 

Thursday, July 21, 2011

Helping Your Books Survive Your Kids


I love books & have been collecting children's books from the moment we got married in hopes that I would raise a little reader too. Fortunately E LOVES her books, but  in no time her board books were showing some serious wear.


After watching them die a slow death I figured I needed to do something to help them last a little longer. I took a queue from the library & decided to reinforce the binding with tape.   


Simply take clear tape & tape the length of the binding.  Take your time, you don't air bubbles & you really only want to do this once, especially if your book is already battered.  Once you've applied the tape to the binding carefully smooth it down on either side. 


When it's said & done you can hardly tell the tape is there, with the exception of the end where the tape was broken.  I first tried this several months ago & the books are still going strong.  If you've got little ones at home this is a great way to get more life out of their books.  You might just love it so much you do all the books in your home. 

Monday, June 27, 2011

Peter Piper Picked a Peck of Pickled Peppers...


I had grand plans for my garden this year.  Unfortunately, due to poor planning, most of my little seedlings did not survive transplant into the garden.  Those that did make it have burnt up in the heat & are unlikely to produce any food.  Without being able to grow my own food I've had to come up with a Plan B:  Buy produce at the peak of the season, as cheaply as possible, & freeze it.

Enter last week's Aldi specials; a 3 pack of green peppers for $0.99 & a bag of vidalia onions for $0.99.  Of course as absent minded as I am, I forgot to go to the store until an hour before close Tuesday evening.  I was quite distraught & assumed it was unlikely they would have any sale produce left, but I figured it was worth a shot.  To my surprise, not only did they have a fecundity, they had it marked down!  Peppers for $0.69 & bags of onions for $0.39.  


I promptly bought 7 packs of peppers (21 total) & 3 bags of onions & went to slicing & dicing (while reciting Mother Goose, naturally).  My plan was simple:  prepare the peppers and onion into dinner size portions, so all I have to do is throw it in the skillet when I want to make fajitas, omelets, stir-fry, what have you.  After several nights of reciting Peter Piper I ended up with 9 bags of fajita type mix & 5 diced bags of peppers & onions for fritattas.  I'm hoping that will last us well into the winter & hopefully to the spring.  All for only $6!

I'm hoping to do the same with strawberries & other produce as it goes on sale.  The main component to this plan it to get premium nutrition for minimal cost, but we shall see how it works.  Ask me in February...

Wednesday, June 22, 2011

Frugal Experiments

I suppose I just miss chemistry class, but I truly enjoy experimenting around the house. I'm always trying to find a greener & cheaper way of doing things I already do.  Here are a few of my latest efforts:

Recycling Pickle Juice-- I have read in both the Tightwad Gazette & other frugal websites that by taking the pickle juice of store bought pickles & adding a new cucumber you can create your own pickles.  So when I ran out of Vlasic pickles (my favorite non-store brand pickles) I figured I should try it out. 


I promptly bought 2 pickling cucumbers, sliced them up, submerged them in the juice, & left the on the counter to pickle.

 
I think I waited around a week & a half before I opened the jar, but as soon as I opened the lid I could tell something was...off.  The juice was carbonated & it smelled like pickles & beer.  Never being one to shy away from such things I pushed through the strange smell & tried a pickle.  It was rather firm, rather carbonated, & didn't really taste much like any pickle I've ever had.  I'm not sure if the pickling time was a factor or what, but for me, this was a major Frugal Fail. 

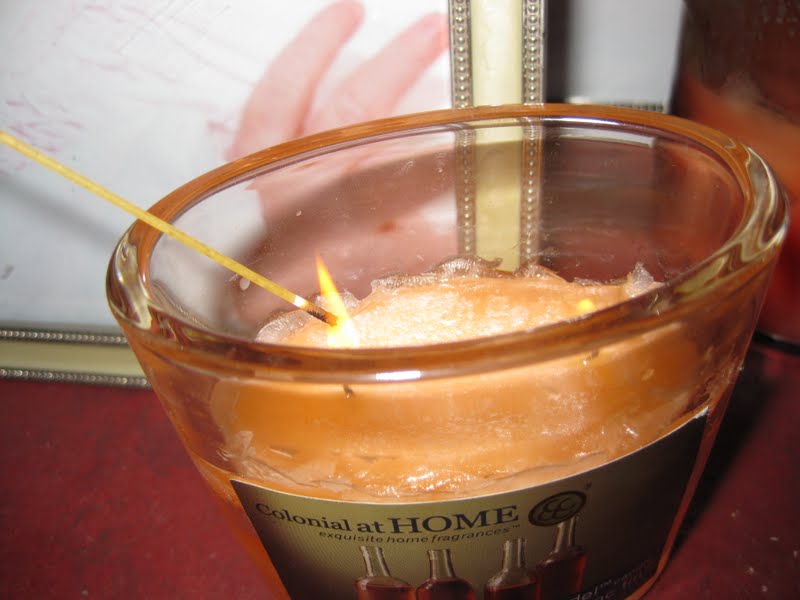
Spaghetti for a candle lighter--For most candles, once they burn down  you have to use one of those long butane lighters, which are expensive, & to my knowledge, not recyclable.  To cut down on the waste try using a piece of spaghetti. 


Simply light the end of the spaghetti & then use it to reach down to your low laying wick.  After you've extinguished the flame simply snap off the end, throw out the ash, & save the piece of spaghetti for the next time you need to light a candle.  I love using this method & haven't bought one of those long lighters in years.  I will say that my sisters don't like this method because they don't like the smell of the burnt spaghetti.  Try it once & find out for yourself.  The smell doesn't really bother me & goes away quickly, so for me, this is the way to go.


Conditioner for shaving cream--I use my razor blades forever.  They have to be dull as dirt & rusty before I'll change them out.  That being said, after a while I need a little something on my legs to lessen the feeling of my skin being pulled off as I shave.  I've heard the suggestion of using conditioner as a shave cream for many years now, but I've never been in a position where I felt it would be financially worth my while, seeing as how I have always seemed to have a stockpile of nearly free shaving cream. 


That was until I pulled out my last can of shaving cream & realized I had a whole lot of conditioner & not a lot of shaving cream, so I figured what the heck, I'd try it.  It actually works REALLY well.  Like, amazingly well.  Like, I may never ever buy shaving cream again well.  It sticks to your skin better than shaving cream, doesn't dissolve as quickly in water, you don't have to use very much (a dime size/ half a leg), & it's a great way to use up hotel conditioner that doesn't really do it for your hair. 

I'm not sure what the financial breakdown between using shaving cream & conditioner would be, especially because I haven't spent much money on either for years, but, if you happen to have a large stockpile of unused conditioner this is a great & cheap way to shave.

Even if you just try one of these things they'll save you some cash & trash.  Any of you lovely readers have any other great frugal/green tips to share? 

Monday, June 20, 2011

My 1st Attempt at DIY

We're not huge DIY people.  I think that's mostly because we rented when we were first married, and by the time we actually bought a house I was pregnant, & then we had newborn, and well, you get the idea.  I think we also know that this probably won't be our forever house, so we don't really want to do anything too crazy for fear of not getting the return on our investment.
Toile nightmare, complete with the old owner's accessories. 
The one exception to this has been the nightmare that is our toile wallpaper foyer & dining room.  Can I say YUCK?!  Seriously, I have no idea how the old owner of our house could put that busy, weirdo wallpaper up & think it's cute.  From the moment we looked at this house I've hated it.   HATE.  So when my good friend Kayla visited & volunteered to help me remove it I was BEYOND stoked.


Kayla hard at work
To save money I used leftover paint & primer from the old owners, as well as painters tape I won  from a blog.  We did have to spend $50 on wallpaper removing accoutrements & enough painting supplies, but we got enough for several projects.  We scored the wallpaper with a $10 tool & then soaked it with hot water & fabric softener (samples of course).  We then peeled & removed the paper, but unfortunately my over zealous spritzing got the best of me & I also loosened the paint underneath the paper.


That then caused us to have to patch & prime the wall before we could paint.  Once that was finally done we admired our work & I think it came out pretty great for our first effort.  It's not perfect, but it sure looks better than that hideous wallpaper.  Nothing like a little sweat equity to bring friends closer together. 

Now if only I could tackle that dining room... Volunteers?